In this post I'm going to show how to develop CXF web service and step by step guide to deploy it to the JBoss FUSE server. While I'm learning the stuff it gave me little bit frustration due to the lack of resources to learn this technology as a beginner. Then I though to put it as blog post so in future any one can refer the guide line.
Prerequisites
- You should have install java 1.8 to support latest jboss-fuse-6.3.0
- You should have install JBoss Developer studio
- Your PC should setup Maven installed and configured.
01) Lets create the FUSE CXF project
First open the JBoss Developer Studio and go to File-> New -> Fuse Integration Project. Then provide the project name.
 |
| Figure 1: Provide the project name |
Then select the run time environment of the Fuse server then click next. This should be setup in your JBoss Developer studio. If not you have to setup new run time environment by click on new button.
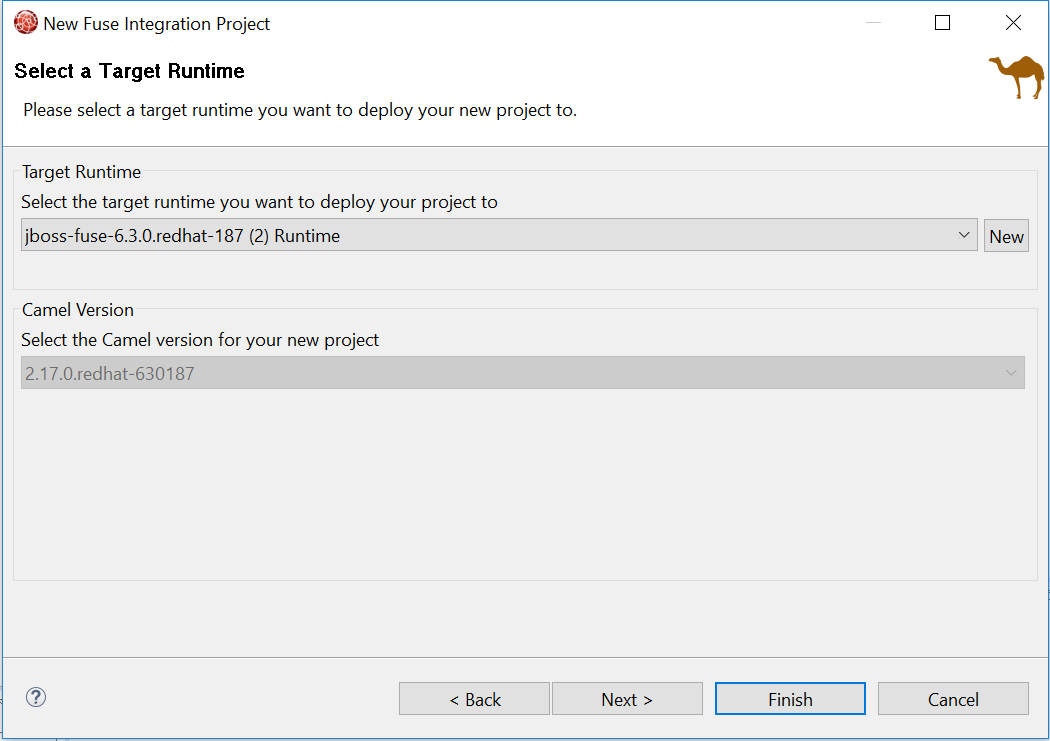 |
| Figure 2: Select the run time environment |
On next interface you have to select "Start with an empty project" and "Spring DSL" as show on below figure.
 |
| Figure 3: Select "Start with empty project" and "Spring DSL" as project type |
Then click finish and it will take some time to create the project in Development studio. Please note that some times IDE get unresponsive as well. Then you will be able to see similar interface to below figure.
 |
| Figure 4: New project interface |
Then right click on the "main" folder under src folder and then go to new->Folder, set folder name as "java". Then right click on the java folder and then go to new->Interface. Then provide the name for the service in my demo I'll give as "DemoOrderService" and package as "com.demo.order" then click finish. (show in below figure)
 |
| Figure 5: Interface for the service |
Then again add two classes in to "java" folder as "Input" and "Output" as show on below figure.
 |
| Figure 5: Add DemoOrderSerice interface and Input and Output classes |
Then add following content in to Input class.
package com.demo.order;
public class Input {
private String fName;
private String lName;
private String age;
private String country;
public String getfName() {
return fName;
}
public void setfName(String fName) {
this.fName = fName;
}
public String getlName() {
return lName;
}
public void setlName(String lName) {
this.lName = lName;
}
public String getAge() {
return age;
}
public void setAge(String age) {
this.age = age;
}
public String getCountry() {
return country;
}
public void setCountry(String country) {
this.country = country;
}
}
Add following content in to Output class.
package com.demo.order;
public class Output {
private String name;
private String status;
public String getName() {
return name;
}
public void setName(String name) {
this.name = name;
}
public String getStatus() {
return status;
}
public void setStatus(String status) {
this.status = status;
}
}
And add following content in to the DemoOrderService interface.
package com.demo.order;
public interface DemoOrderService {
Output provideOrder(Input input);
}
Then double click on the "camel-context.xml" file in the "src\main\resources\META-INF\spring\" directory. Then click on the source section as show in below figure.
 |
| Figure 6: Click on the source section as show in above |
Then update the beans declaration as below. I have added bold section in to the bean definition.
<beans xmlns="http://www.springframework.org/schema/beans"
xmlns:cxf="http://camel.apache.org/schema/cxf"
xmlns:xsi="http://www.w3.org/2001/XMLSchema-instance"
xsi:schemaLocation="http://www.springframework.org/schema/beans
http://www.springframework.org/schema/beans/spring-beans.xsd
http://camel.apache.org/schema/spring http://camel.apache.org/schema/spring/camel-spring.xsd
http://camel.apache.org/schema/cxf http://camel.apache.org/schema/cxf/camel-cxf.xsd ">
Then add following section just after the beans definition,to define the web service in our application.
<cxf:cxfEndpoint address="http://localhost:9292/cxf/order"
id="demoOrderEndpoint" serviceClass="com.demo.order.DemoOrderService"/>
Then inside the camel-context delete the existing content and add following content
<route id="cxf">
<!-- route starts from the cxf webservice in POJO mode -->
<from id="demoOrderEndpointListener" uri="cxf:bean:demoOrderEndpoint"/>
<recipientList id="dispatchToCorrectRoute">
<simple>direct:${header.operationName}</simple>
</recipientList>
</route>
Then add the following route details after that. In here direct:provideOrder refer to the provideOrder method in the service interface.
<route id="Order">
<from id="statusIncidentStarter" uri="direct:provideOrder"/>
<log id="logStatusIncident" message="OrderDetails Call"/>
</route>
Then right click on the java folder and add new class call "OrderProcessor" add following content in to that class. Note that this class should be extend org.apache.camel.Processor class and should override the process method.
package com.demo.order;
import org.apache.camel.Exchange;
import org.apache.camel.Processor;
public class OrderProcessor implements Processor {
@Override
public void process(Exchange exchange) throws Exception {
Input input = exchange.getIn().getBody(Input.class);
Output output=new Output();
output.setName(input.getfName()+" "+input.getlName());
output.setStatus("OK");
exchange.getOut().setBody(output);
}
}
Then add this bean in to camel-context.xml before the beans declaration.
<bean
class="com.demo.order.OrderProcessor" id="orderProcessor"/>
Then update the Order route as below in there we refer the bean which we defined on above step by id on the bean definition.
<route id="Order">
<from id="statusIncidentStarter" uri="direct:provideOrder"/>
<log id="logStatusIncident" message="OrderDetails Call"/>
<process ref="orderProcessor"/>
</route>
Whole camel context.xml will have following content.
<?xml version="1.0" encoding="UTF-8"?>
<!-- Configures the Camel Context-->
<beans xmlns="http://www.springframework.org/schema/beans"
xmlns:cxf="http://camel.apache.org/schema/cxf"
xmlns:xsi="http://www.w3.org/2001/XMLSchema-instance"
xsi:schemaLocation="http://www.springframework.org/schema/beans
http://www.springframework.org/schema/beans/spring-beans.xsd
http://camel.apache.org/schema/spring http://camel.apache.org/schema/spring/camel-spring.xsd
http://camel.apache.org/schema/cxf http://camel.apache.org/schema/cxf/camel-cxf.xsd ">
<cxf:cxfEndpoint address="http://localhost:9292/cxf/order"
id="demoOrderEndpoint" serviceClass="com.demo.order.DemoOrderService"/>
<bean
class="com.demo.order.OrderProcessor" id="orderProcessor"/>
<camelContext id="_camelContext1" xmlns="http://camel.apache.org/schema/spring">
<route id="cxf">
<!-- route starts from the cxf webservice in POJO mode -->
<from id="demoOrderEndpointListener" uri="cxf:bean:demoOrderEndpoint"/>
<recipientList id="dispatchToCorrectRoute">
<simple>direct:${header.operationName}</simple>
</recipientList>
</route>
<route id="Order">
<from id="statusIncidentStarter" uri="direct:provideOrder"/>
<log id="logStatusIncident" message="OrderDetails Call"/>
<process ref="orderProcessor"/>
</route>
</camelContext>
</beans>
Now we have completed the development of our Demo service lets build our application and deploy it in to the Fuse server.
Then go to the project root directory using command line and then enter following command.
mvn clean install
Then you will see the build success message and then open the FUSE console by double click on the fuse.bat file. Then install our application in fuse server by type and enter following command.
osgi:install -s mvn:com.mycompany/camel-spring/1.0.0-SNAPSHOT
Then go to the http://localhost:8181/cxf/ URL then you will be able to see similar interface to below figure. (http://localhost:9292/cxf/order?wsdl this will be the our service wsdl according to the configurations)

Then lets test our web service on SOAP UI. Open the SOAP UI interface and go to New -> New SOAP Project. Provide a name for the project and provide wsdl as http://localhost:9292/cxf/order?wsdl. (Please refer below figure)
 |
| Figure 8: New SOAP project |
Then double click on the request node on left panel under the
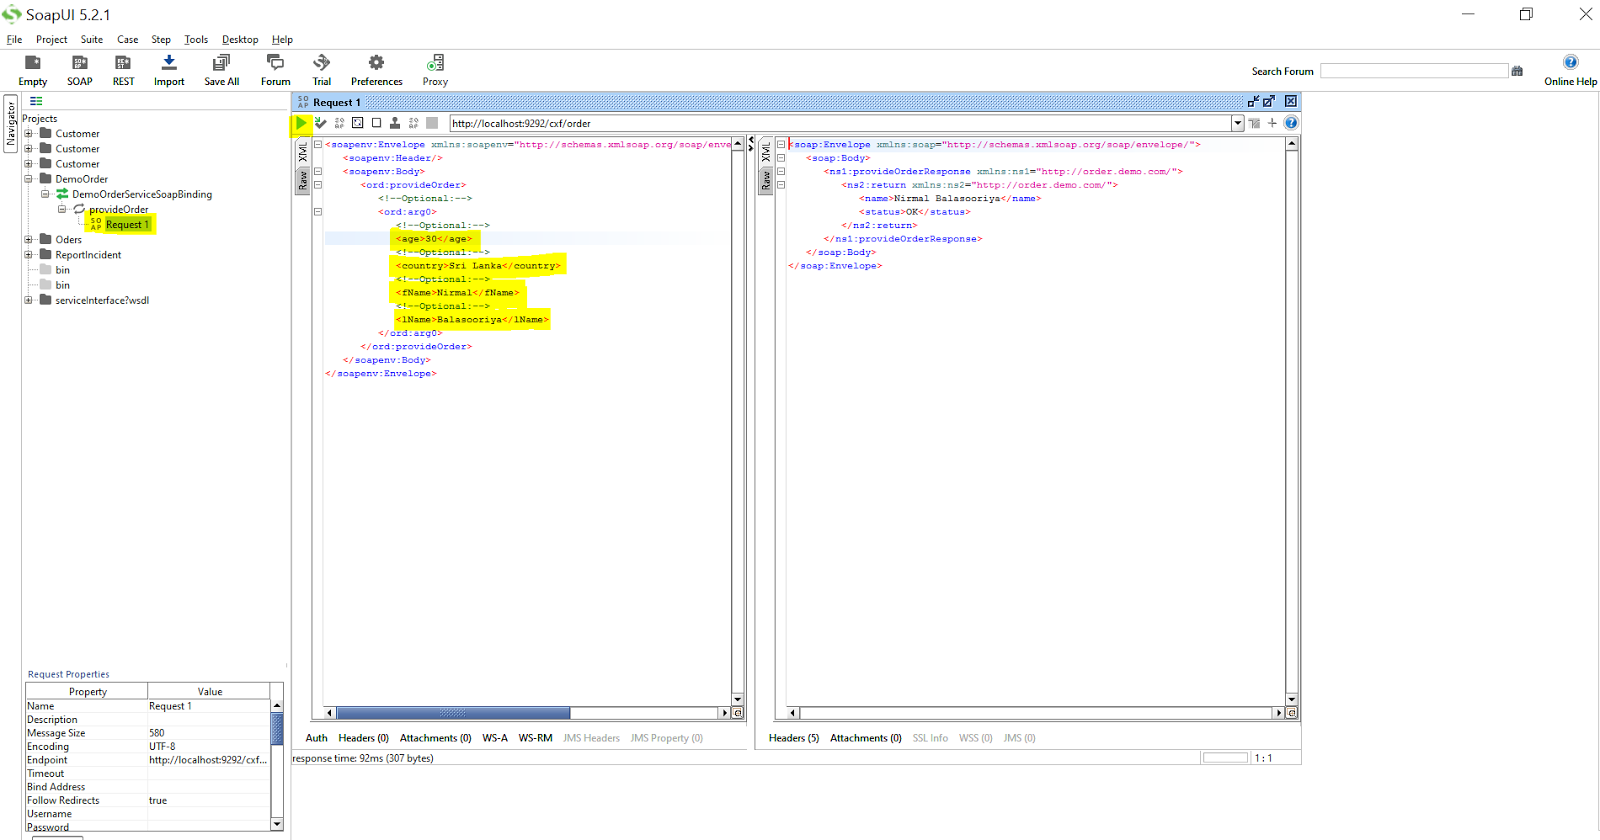 |
| Figure 8: SOAP UI project request and response. |
You can access the code from following link on GIT repository.
How to generate wsdl file?
ReplyDeleteAccording to above post you can access wsdl using http://localhost:9292/cxf/order?wsdl URL after successful deployment of the project in to FUSE. From there you can right click it and click on "Save As". Then give preferred name and set file extension as wsdl.
DeleteI need to know how internally wsdl is created, is it getting created by Camel? if then how?
DeleteThanks in advance, Keep up good work :-)
WSDL will be generated by Camel CXF component. In this example it's based on the "DemoOrderService" interface. In camel we have to define the action needed to perform when request hits on target. If you need more information please refer the camel cxf documentation http://camel.apache.org/cxf.html.
Deletei can access to wsdl only http://localhost:9292/cxf/order?wsdl but i cant access with de ip adress or the name of host
ReplyDeletecan you help me?
i change localhost with 0.0.0.0 and it works
DeleteSorry for the late reply. Yes you are correct you can use 0.0.0.0 and then you can access the web service using ip.
DeleteExcellent tutorial! I've been looking for something this clear for at least one week! Thanks for it
ReplyDeleteThis comment has been removed by the author.
ReplyDeleteThanks for sharing the valuable information here. Keep sharing more informative articles.
ReplyDeleteCustomer Service Support
Business Process Outsourcing Services
Mobile application development company
This comment has been removed by the author.
ReplyDeleteI would like to thanks for this blog, keep sharing your thoughts like this because it contains more useful information...
ReplyDeleteSoft Skills Training Institutes In Chennai
Soft Skills Online Course
Thanks for sharing this great information with us...
ReplyDeleteUses of Data Science
Why Data Science is important?